Collecting Payments Via Authorize.net With The Flexxbuy Invoice Creator
The Invoice Creator in the Flexxbuy Application Portal can be used as a powerful tool to collect outstanding payments from recently funded applicants. The following guide will show you how to get started and use it with ease.
A: Set Up
Before you can use the invoice creator to collect payments, your account in the Flexxbuy portal will first need to be linked to a valid Authorize.net account. This can be accomplished via the following steps.
- Log in to your account with Authorize.net.
- Once logged in, locate the "Settings" link on the left-hand navigation menu, under the "Account" header.
-
In the "Security Settings" section of the Settings page, you will find a link labeled "API Credentials & Keys".

-
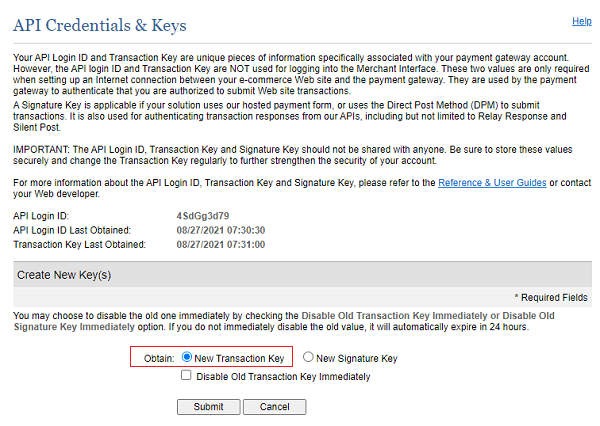
In the API Credentials & Keys page, locate the section title "Create New Key(s)", check "Obtain New Transaction Key" and click submit. Notate the API Login ID located just above the key creation section, and the new Transaction Key that is generated.
Please note: Generating a new Transaction Key will disable currently existing keys. If this will disrupt your business flow, you will need to locate your existing key to use for this purpose. - Enter both of these values in the portal interface to link your account.
B: Using The Invoice Creator
The invoice creator is conveniently located right on the applicant page in the portal, in the upper-right section alongside 'Notes' and 'Payments'. It can be used through the following steps.
- View the applicant that you want to send an invoice to in the portal.
- Locate the 'Invoice' tab in the upper-right section, and click 'Add Invoice'.
- Fill out the invoice form (shown below) with the relevant information for your sale. The '+' icon can be clicked to add additional items to the invoice, if required.
Please note: On the invoice form, the following fields are mandatory; Invoice date, Shipping, Tax, Price, and Quantity. The date will be automatically set to the current date, though you can change this as needed. Additionally, you can enter 0 for Shipping and/or Tax if they are not applicable to your sale. - Upon saving your invoice, you will now see it listed under the 'Invoice' tab, along with the options to Edit, and Send it by Email or SMS. Clicking one of the 'Send' options will bring up an interface where you can specify an email address (or phone number), as well as the amount you wish to collect at this time.
- When the applicant receives the invoice by email or SMS, they will be given the option to pay the requested amount. If the Authorize.net setup has been successfully completed, these payments will automatically be sent to you, and the remaining balance shown in the 'Invoice' tab will reflect the amount paid.
- The invoice links that you send out will remain active for 5 days, and can be reused to make subsequent payments for that duration. Please be aware that payments made for the same amount within a 24 hour period may be flagged by Authorize.net as unintended duplicates.


That's all there is to it! You are now ready to begin collecting payments from your applicants to better facilitate and ensure the completion of your sales. If you encounter any issues or confusion, please reach out to Danw@flexxbuy.com for assistance, and we will help however we can.

